You have survived the holidays. You have opened your presents, eaten too much and have snapped dozens of photos of the family. Sure, you could share the images on the Internet, but Grandma and Grandpa probably would like to have some pictures for their refrigerator or scrapbook, and not everyone has the time or patience to flip through every picture you publish online. Besides, there is something wonderful about having photo prints that the whole family can share. So be your own editor, pick some of the good pictures and learn how to print them like a pro.
Difficulty: Moderately Easy
Instructions
1.

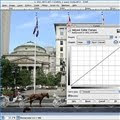
Prepare the images for printing. Use a photo-editing program like iPhoto, GIMP or Photoshop to crop the images. Adjust the color of the image, if required, and use a red-eye removal tool if any of the subjects of the picture have red eye. Look at the overall saturation of the image and adjust the contrast and brightness of the image so it looks perfect on the screen.
2.

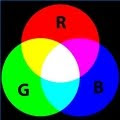
Choose the right paper. Just because it looks perfect on the screen doesn't mean it will look perfect when printed. Keep in mind that the computer screen is a device-dependent RGB color device. Every computer screen is different but they are all based on the additive RGB color model. Printers are all based on the subtractive CMYK color model. RGB starts with black, then adds color (red, blue, green) to create the image.
Our eyes are RGB devices. When we see a red apple, we see light reflected from the apple. In print, we see the light reflected from the base through the transparent inks.
CMYK starts with white and then subtracts color (cyan, magenta and yellow) to create the image. This makes the choice of paper critical to the image, since it will determine the brightness of the white and therefore affect the whole tonal range.
Photo printing papers are sold with different brightness numbers; the higher the number, the brighter the white. The finish of the paper also affects the tonal range. Experiment with both glossy and matte stocks on different images to get a feel for how they look.
3.

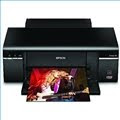
Learn how to print on an ink jet printer. All ink jet printers use ink and have different methods for distributing the ink. The ink jet printer you have on your computer, in most cases, is sufficient for color photo printing with the right paper.
Another choice would be ink jet photo printers. These printers typically are piezoelectric as opposed to thermal and they produce higher quality. They are also more expensive. Many ink jet printers have a black and a color ink cartridge. The color ink cartridge contains YMC colors together. Higher-quality photo printers may have multiple yellow, magenta and cyan cartridges and use drop-on-demand technology to allow for greater saturation of colors and a larger color gamut.
If you have an ink jet printer, try printing an image on standard paper to give you an idea of the color gamut. Make sure you buy ink jet paper for your ink jet printer.
4.

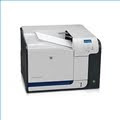
Learn how to print on a color laser printer. Laser color printers use dry ink, or toner, to create the image. These printers use a different type of paper than ink jet printers and use xerographic technology to bond the toner to the paper. The print comes out dry and cannot smear like an ink jet print.
This basic technology is the foundation of high-quality digital printing today and machines vary in price from $300 to millions of dollars for industrial machines. Color laser printers can achieve a large color gamut and the cost per copy can be inexpensive, depending on how much you use it.
5.

Use a professional service. If you don't have a color printer and don't want to buy one, consider having your photos printed using a professional service. Most photo sites like Flickr, Kodak Gallery and Nikon offer inexpensive print services.
In many cases, the quality of such a service is adequate, but not truly "professional" quality. If you want to make just a few wallet prints for the family, this service would be fine. But if you want to make a 16-by-20-inch enlargement for framing, a better option would be to use a professional photo finisher. There are many to choose from, including top service McKenna Labs.
6.

Do a test print. Regardless of how you decide to print your images, do a test print first on regular paper and analyze it for color balance. Is the print too blue or too green? Try attaching a color profile or adjusting the white balance in your photo-editing program and do another test print.
Adjust the curves, if necessary, and print another test print. Once you feel the color balance is good on regular paper, make a test print on photo paper. If the quality is good, then save your curve settings and color settings as a profile and make this color profile the default for your printer. Apply this profile when you use it with the specific paper stock that you tested.
You may have to create multiple profiles for glossy and matte finishes. Professionals will use color calibration tools for their monitors and color spectrophotometers to read the color information from the print. These are not tools that amateurs can afford.
how to.com


Join The Community